Web Design Project
The aim was to create a digital sanctuary that eloquently reflects the essence of a Japanese American museum. Our target audience comprises those who possess an insatiable curiosity to immerse themselves in the intricate tapestry of Japanese American culture and history. Exhaustive research unveiled that the museum's narrative transcends the boundaries of Japanese American heritage; it aspires to be the steward of the rich history and culture of Japanese individuals in the United States.
Our design philosophy gracefully guides visitors through this rich tapestry, ensuring that they can seamlessly access their chosen exhibitions or activities. With an attentive user-centric approach, one particular page employs a soothing blue palette to distinguish member activities and culturally enriching exchange programs.
Recognizing that many users embark on a digital journey before visiting the physical museum, our website extends its embrace by offering sections that guide prospective visitors and provide essential details about museum ticket pricing and regulations.
Meticulously tailored to diverse devices, our design ensures that content is accessible and visually immersive on desktops, tablets, and mobile devices. Influenced by traditional Japanese hues like kachi (brown), gold, gray, and white, our color palette creates an ambiance that seamlessly blends the enduring strength of Japanese tradition with a contemporary aesthetic.
In this digital realm, the museum unfolds an array of traditional cultural courses and immersive exhibits. The practical journey of website creation commences with meticulous planning, using pencil and paper to sketch the initial blueprint, subsequently brought to life with Adobe XD. This design encapsulates the museum's core objectives, resonating with the discerning expectations of our users.

Japanese American National Museum
Process
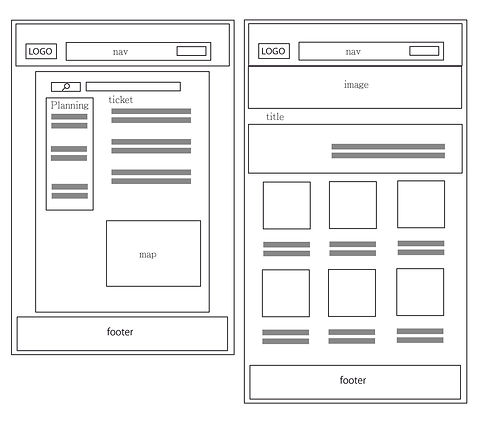
Draft
First, I plan the website layout. Use Illustrator to create a rough sketch of the website layout, and then use Adobe XD software to make the design more clear, ensuring that it is organized in a way that aligns with the museum's goals and meets user expectations.
Writting HTML/CSS
Next, begin writing HTML code to establish the website's fundamental structure. Based on the website's layout, divide it into multiple sections and add corresponding tags in the HTML document. These tags can include <header>, <nav>, <section>, <article>, <footer>, and others.
Afterward, start adding content. In each section, include headings, body text, as well as images and media. Once the basic framework is in place, add appearance and style by creating a CSS (Cascading Style Sheets) file to adjust the website's layout, text alignment, background colors, and element padding, among other design elements, making the website visually appealing and easy to read."
Customize the website using CSS style attributes. Change the background color, font size, font type, and other visual elements to ensure that the website remains consistent with the original design. Additionally, enhance the website's navigation, interactivity, and overall design by adding advanced CSS and JavaScript code to complete the website.
illustior/Adobe XD
Brackets
User Flow
